SarrpCS 5.0.3 Upgrade Instructions
Applicable Systems
This software upgrade is applicable to SARRP systems with a type 3 MP1 x-ray controller.
Note that this software version only includes a workaround fix for type 3 MP1 x-ray controllers. There are no other functional differences between 5.0.2 and 5.0.3.
Minimum Software Versions
| Software | Version |
|---|---|
| Basler | 5.2.0 |
| Varian | L08 |
| Perkin Elmer | 3-3-3-14 |
| SarrpCS | 5.0.0 |
Instructions
Create a Backup of Critical SARRP Directories
- Backup the
C:\Program Files\sarrpfolder into a date-stamped subfolder inC:\Xstrahl Service Data\.- For example:
sarrp_backup_2018_may_08. - To create a backup, right click the folder and select
Send to. Then selectComressed (zip) folder.
- For example:
- Backup the
C:\SARRP_Datafolder (possibly excluding all the calibration image data. This is left to your discretion) to a date-stamped subfolder inC:\Xstrahl Service Data\.- For example:
sarrp_data_backup_2018_may_08.
- For example:
- Upload both backups to
DropBoxunder the appropriate customer site folder.- For example
DropBox\Customer Sites\SARRP\<customer site>\Backups\Backup_YYYY_MM_DD
- For example
Upgrade SarrpCS
- Run the installer for the SarrpCS software that corresponds to the correct hardware configuration for the system.
- When prompted, ensure that you select an
Upgradeinstall type and notFull. SelectingFullwill result in overwriting any calibration data on the system. - Navigate to
C:\Program Files\sarrpand delete thedllfolder.
Update the System Path
- Open the Start menu (bottom left or hit the
Windowskey) - Search for
Environment - Select the option
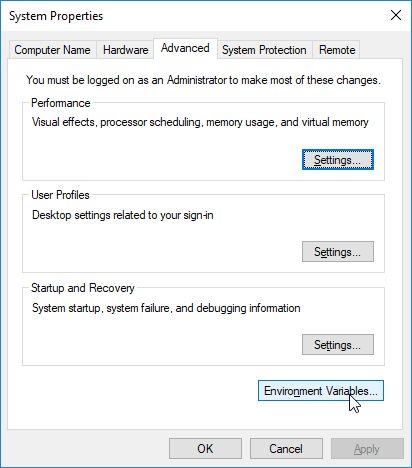
Edit the system environment variables - In the pop-up that opens select
Environment Variables.
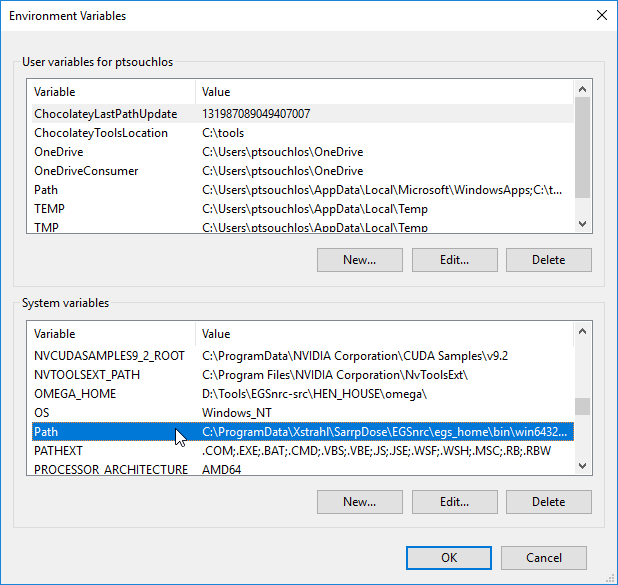
- In the
System Variablessection, scroll down and findPath.
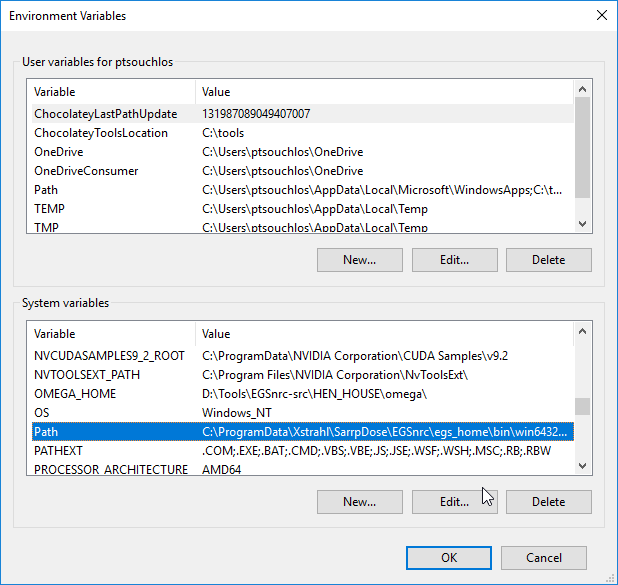
- Click
Edit

- Delete the paths
C:\Program Files\sarrp\binandC:\Program Files\sarrp\dll - Enter the desired path and click
Ok. - Exit all subsequent pop-ups by clicking
Ok.
Update CT Preset Name
SarrpCS has the ability to auto-switch to an Imaging x-ray preset automatically when performing a CT. The way this works is that SarrpCS looks for a preset named CT Imaging to switch to, otherwise it switches by default to 60 kV, 0.6 mA at 67 seconds. By default, SarrpCS does not create a preset with the name CT Imaging. To have control over what kV/mA conbination is used for imaging when auto switching, it is recommended that a new preset is created with the proper name that will be used for CT acquisition. To do this, follow these steps:
- Navigate to
C:\Program Files\sarrp\dataand open thePresetData.txt - Add the line:
CT Imaging|<kV>|<mA>|FINE|1.1where<kV>is the voltage to use and<mA>is the amperage amount to use. - Save the
PresetDatafile and restart SarrpCS to have the changes take effect.
Varian Panel Firmware Upgrade Instructions
In order to work on Windows 10 and with the L08 version of the ViVa software, Varian panels need an upgraded firmware installed if they are running an older release. All systems currently in the field will require this upgrade to work on Windows 10. This section details the steps required to accomplish this necessary upgrade.
Required components:
Steps
- Open the start menu and search for
Add or Remove Programs. - Select the found option in the start menu.

- Search for
ViVaand uninstall it. - Search for
Pleora - Select
PaxscanPleoraPv64and uninstall it. - Once completed, unplug all other ethernet devices except the panel (i.e. Galil and Basler Camera(s)) and the internet connection (if connected).
- Follow the step by step instruction in the provided upgrade guide. Be sure to follow them carefully.
- Install the new version of ViVa by running
setup.exethat is in the L08 folder previously downloaded. - Follow the included instructions
VcpInstallGuide.pdf. Step by step instructions begin on page 5 of the document.- It is essential that the NIC settings are also adjusted as outlined in the instructions.
Troubleshooting
In order for the updater to work, the address of the port used for the panel must be on the same subnet as the panel address. The firmware upgrade tool will indicate if the subnet masks do not match. To fix this you can change the panel IP address or change the ethernet adpater IPv4 address.
If you change the panel IP address, you need to update the HcpConfig.ini file in the C:\IMAGERs\<Panel Folder> directory. Under the section [HcpFgPleora], modify the PleoraIpAddress field to match the new IP address of the panel.
Considerations for Motorized Filter Changer
If the SarrpCS system is receiving a motorized filter changer (MFC) and already has an MVC then some changes need to be made to the MVC config files.
Procedure:
- In
C:\Program Files\sarrp\data, open themvc_cfg.txtfile - Remove all data related to the
Haxis.
Example of what the file should look like after editing (values may be different for the various axes):
#Config File for Motorized Variable Collimator

#                     F           G
#                    LONG       SHORT
#                   MVC_X       MVC_Y
cnts_per_mm      47214.37,   47214.37
pid_kp             32.380,     37.880
pid_ki             12.477,     14.578
pid_kd            242.130,    283.000
contin_tlim           5.0,        5.0  # Continuous Torque Limit (TL)
max_tlim                3,          3  # Maximum Torque limit (TK)
cur_gain                0,          0  # Amplifier current loop gain (AU)
jt_home           1293673,     681067  # Defines zero position (in cts) after homing
jt_ulim              80.0,       40.0  # Maximum size at isocenter (mm)
jt_llim               5.0,        5.0  # Minimum size at isocenter (mm)
jt_home_fast          1.0,        1.0  # Speed for fast find edge (mm/sec)
jt_home_slow         0.25,       0.25  # Speed for slow find edge (mm/sec)
jt_home_retract       1.0,        1.0  # Retraction to release home switch