Voxl Installation Instructions
Installation
Download and run the latest installer from the Voxl software page.
Licensing
Once installation is complete, run the LicensingToolbox application in the Voxl installation directory. This can be found at C:\Program Files\Xstrahl\Voxl\tools\LicensingToolbox\LicensingToolbox.exe.
Set Up a License Runtime
- Launch the Licensing Toolbox software if you have not already
- Click
Install - Wait for installation to complete
- Dismiss the results dialog
Generate a Machine ID File
A machine ID file, or C2V file, is a unique identifier for one specific machine. It must be generated on the machine where CST will run. The machine ID file is sent to Varex, and Varex responds with a license activation file that enables licensed features on that machine.
To generate a machine ID file:
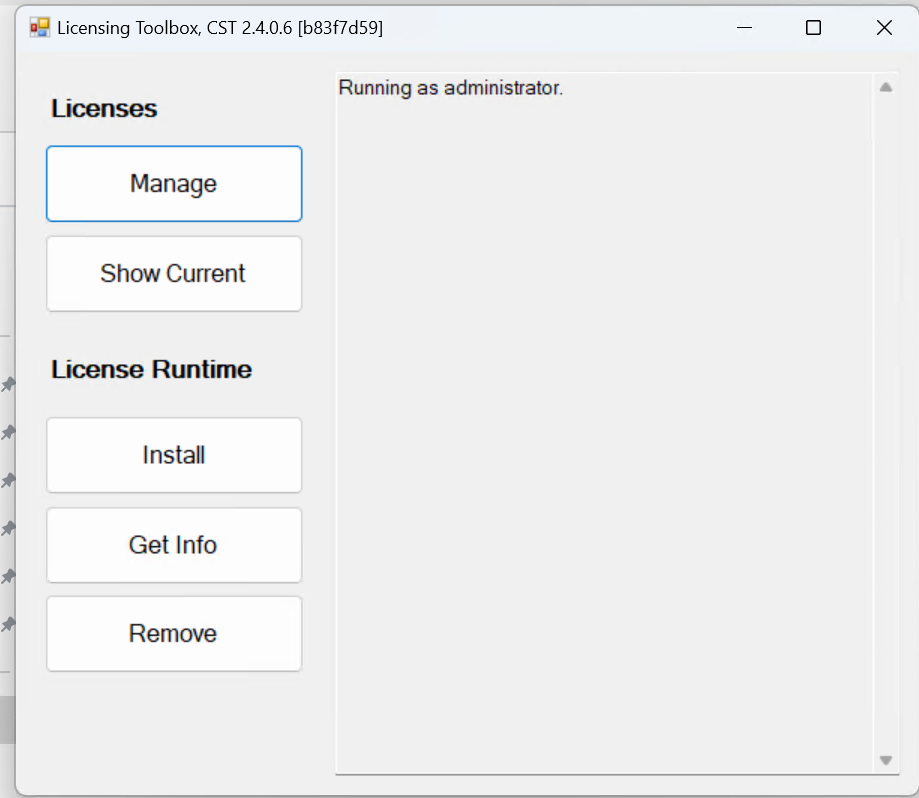
- Run the Licensing Toolbox application
- If a User Account Control (UAC) prompt appears, allow the application to run with administrator privileges
- Click the “Manage” button in the “Licenses” section
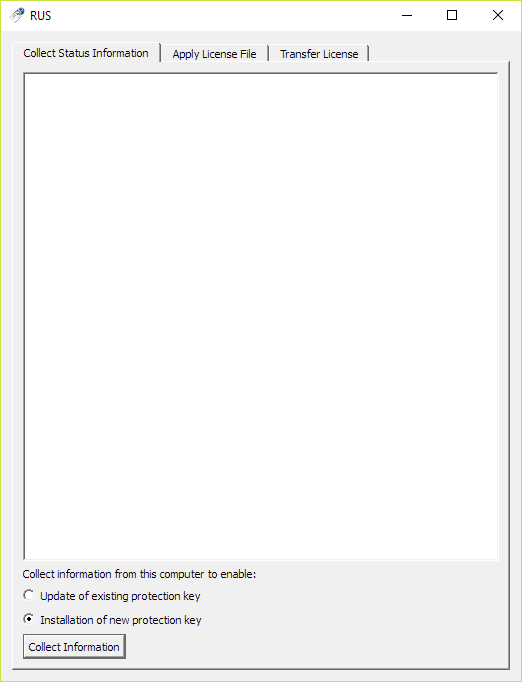
- Go to the “Collect Status Information” tab in RUS as shown in Figure 4.2
- Check the radio button at the bottom for “Installation of new protection key”
- Click the “Collect Information” button
- Choose a file name that identifies the specific machine
- Choose a save location and click “Save”
- Close RUS
- Send your CST Product Key and the machine ID file to Varex at cst.support@vareximaging.com
- Also CC the relevant Xstrahl personnel as a license should already have been purchased before requesting a machine license.
Apply a License Activation File
After a license has been generated by Varex, you will receive a license activation file, or V2C file. This file is used to activate the licensed features on the machine where the machine ID file was generated.
To apply a license activation file:
- Send a machine ID file to Varex and receive a license activation file in response
- Run the Licensing Toolbox application
- If a User Account Control (UAC) prompt appears, allow the application to run with administrator privileges
- Click the “Manage” button in the “Licenses” section
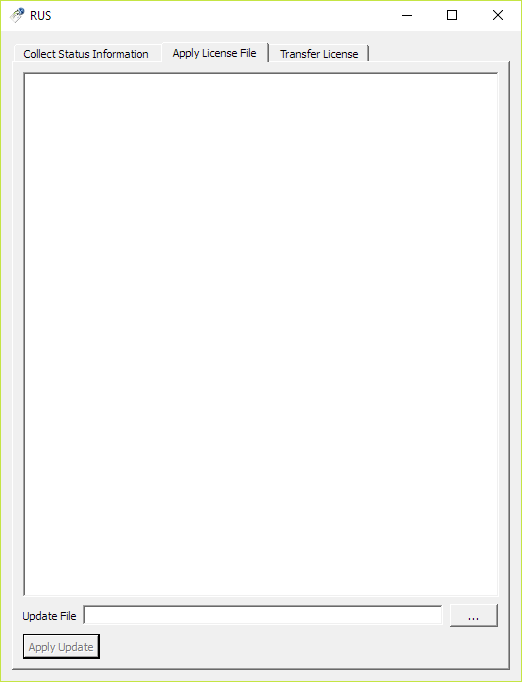
- Go to the “Apply License File” tab in RUS as shown in Figure 4.3
- Click the “…” button at the bottom and choose the license activation file
- Click the “Apply Update” button
- RUS should report success
- Close RUS.
Transfer a License to Another Machine
An activated license can be transferred from one machine to another without Varex being involved. CST will be able to run on the new machine, but will no longer work on the old machine. To transfer a license, begin on the new machine:
- Install the license runtime as described described above.
- Run the Licensing Toolbox application
- If a User Account Control (UAC) prompt appears, allow the application to run with administrator privileges
- Click the “Manage” button in the “Licenses” section
- Go to the “Transfer License” tab in RUS as shown in Figure 4.4
- Follow the transfer instructions on that tab. This process requires running RUS on both the old and new machines, and transferring files between the machines. The end result is license transfer file, or H2H file.
- On the new machine, go to the “Apply License File” tab in RUS as shown in Figure 4.3
- Click the “…” button at the bottom and choose the license transfer file
- Click the “Apply Update” button
- RUS should report success
- Close RUS
Generate Reconstruction Protocols
Reconstruction protocols are used to define the parameters that will be used to reconstruct images from SARRP. MuriSuite presents users with a dialog to select what protocol to use when reconstructing images. Protocols are stored in the C:\ProgramData\Xstrahl, Inc\MuriSuite\cbct_protocols directory.
To create a new protocol:
- Open
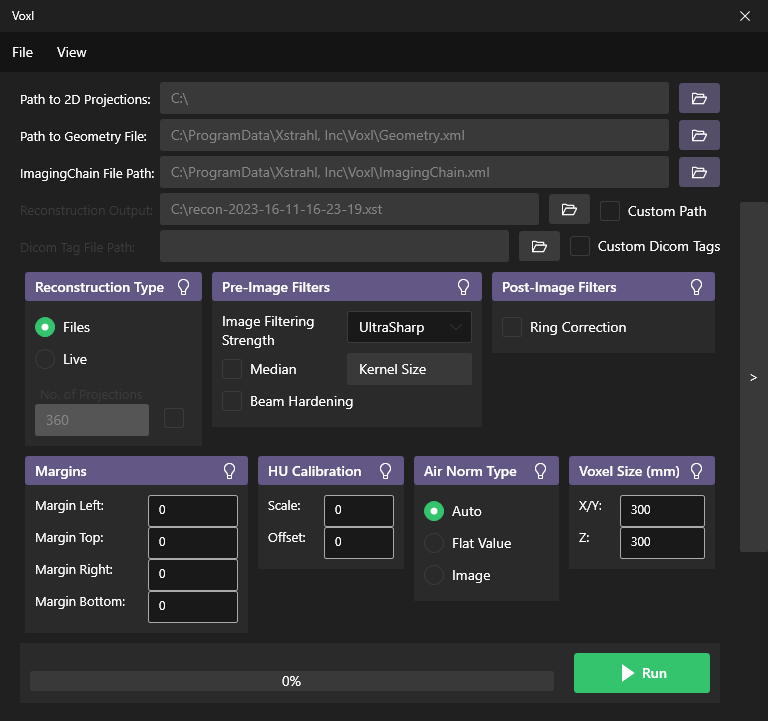
Voxl.GUIfrom the start menu - Set the parameters for the protocol in the GUI as desired.
- Click
Fileand thenExport - Save the protocol with a descriptive name in the
cbct_protocolsdirectory mentioned above. Ensure that the file name has a.jsonextension.
To edit an existing protocol:
- Open
Voxl.GUIfrom the start menu - Click
Fileand thenImport - Select the protocol file you wish to edit from the
cbct_protocolsdirectory - Make the desired changes to the protocol parameters in the GUI
- Click
Fileand thenExport - Save the protocol with the same name in the
cbct_protocolsdirectory, overwriting the existing file.
If desired, save the protocol in a different directory and copy it to the cbct_protocols directory later or create a backup of the original protocol file before overwriting it.
Geometry Calibration
Geometry calibration is a crucial step in ensuring that the Voxl software accurately represents the physical environment. This process involves scanning the Varex geometry phantom and running the acquired images through the bundled geometry calibration tool from Varex called GeoKit. GeoKit is installed along with Voxl and is located in the C:\Program Files\Xstrahl\Voxl\tools\GeoKit directory.
The GeoKit documentation provided by Varex can be found here. Follow the instructions in the documentation to perform the geometry calibration using the GeoKit tool.
The Geometry.xml file for Voxl is located in the C:\ProgramData\Xstrahl, Inc\Voxl directory. This file contains the calibrated geometry data that is used by the Voxl software to accurately represent the geometry of the Varex phantom. This is the same file that is generated and loaded by GeoKit during the calibration process.
If the Geometry.xml file is not present in the C:\ProgramData\Xstrahl, Inc\Voxl directory, use the following file as a template to create a new one:
<?xml version="1.0" standalone="yes"?>
<!-- Last modified by GeoKit, CST 2.3.0.39 [451ee16f] at 2023-01-31 11:30:39 -->
<Geometry>
  <Detector>
    <NumDexelsU>1536</NumDexelsU>
    <NumDexelsV>1920</NumDexelsV>
    <DexelPitchU>0.127</DexelPitchU>
    <DexelPitchV>0.127</DexelPitchV>
    <MarginUMinus>15</MarginUMinus>
    <MarginUPlus>15</MarginUPlus>
    <MarginVMinus>15</MarginVMinus>
    <MarginVPlus>15</MarginVPlus>
    <InputLayout>U-,V-</InputLayout>
  </Detector>
  <StaticGeometry>
    <DetectorOffsetU>-4.146913068986063</DetectorOffsetU>
    <DetectorOffsetV>-2.5669027232324337</DetectorOffsetV>
    <DetectorRollAngle>-0.33507234252574825</DetectorRollAngle>
    <FanType>FullFan</FanType>
    <SourceAxisDistance>350.4709538087752</SourceAxisDistance>
    <SourceImagerDistance>619.3754105242689</SourceImagerDistance>
    <ProjectionAngleOfPositiveYAxis>90</ProjectionAngleOfPositiveYAxis>
  </StaticGeometry>
  <ScanTrajectory>
    <TotalProjectionAngleChange>359.98993510721687</TotalProjectionAngleChange>
    <TotalProjectionAngleChangeStyle>FirstToLast</TotalProjectionAngleChangeStyle>
    <ProjectionAngleRotationDirection>Increasing</ProjectionAngleRotationDirection>
    <RotationLengthType>FullScan</RotationLengthType>
    <DefaultFirstProjectionAngle>180</DefaultFirstProjectionAngle>
    <ExpectedNumberOfFrames>360</ExpectedNumberOfFrames>
    <MaximumNumberOfFrames>1440</MaximumNumberOfFrames>
  </ScanTrajectory>
  <Volume>
    <InputLayout>X+,Y-,Z-</InputLayout>
    <VolumeOffsetX>0</VolumeOffsetX>
    <VolumeOffsetY>0</VolumeOffsetY>
    <VolumeOffsetZ>0</VolumeOffsetZ>
    <VoxelPitchX>0.204</VoxelPitchX>
    <VoxelPitchY>0.204</VoxelPitchY>
    <VoxelPitchZ>0.204</VoxelPitchZ>
  </Volume>
  <GeoKit IgnoreUnless="Varex.GeoKit">
    <Calibration>
      <MarkerRefinement>
        <Enable>False</Enable>
      </MarkerRefinement>
    </Calibration>
    <CalibrationDate>2023-01-31 11:30:39</CalibrationDate>
    <Conventions>
      <DetectorOrigin>ProjectionOfRotationCenter</DetectorOrigin>
      <VolumeOrigin>RotationCenter</VolumeOrigin>
      <VolumeYawOrigin>PreserveFirstFrameInputAngle</VolumeYawOrigin>
      <VolumeZAxis>RotationAxis</VolumeZAxis>
    </Conventions>
    <PhantomName>Mini_57933</PhantomName>
    <ReadProjectionAngleMode>Auto</ReadProjectionAngleMode>
    <Tracking>
      <GateSizeU>3.5</GateSizeU>
      <GateSizeV>3.5</GateSizeV>
      <MinMarkerFractionToEstablishLock>0.8</MinMarkerFractionToEstablishLock>
      <MinMarkersToEstablishLock>8</MinMarkersToEstablishLock>
      <QualityChecks>
        <MaxReprojectionDistance>2.5</MaxReprojectionDistance>
        <MinMarkerCount>6</MinMarkerCount>
      </QualityChecks>
    </Tracking>
  </GeoKit>
</Geometry>
Copy and paste the above XML into a text editor and save it as Geometry.xml in the C:\ProgramData\Xstrahl, Inc\Voxl directory. This will create a new geometry file that can be used by the Voxl software.
User Manual
Download the latest user manual from the Voxl Software Guides page.