MuriGlo Installation Instructions
This guide outlines basic steps necessary to install the MuriGlo software. This guide is valid for MuriGlo version(s):
-
1.5.0 -
1.5.1
Procedure
Installing MuriGlo
- Download and launch the latest installer of MuriGlo software to install it to the computer.
- Check “Add MuriGlo to path”. This will add all the dlls and executables that MuriGlo needs to the path.
- Select
Upgradeif you are upgrading the computer. SelectFullif setting up the computer for the first time. Note: SelectingFullwill overwrite configuration files, proceed with caution. - The remaining options can be left as default.
File Structure
CorrMap.matshould be placed in the C:\MuriGloData\Calibration directory. It has to be namedCorrMap.mat.- Copy the
geometrytransform.csvfile fromC:\Program Files\Xstrahl\MuriGlo\datato theC:\MuriGloData\Calibration\directory. Create the directory if it doesn’t exist. - Experiments are saved in the C:\MuriGlo\Experiments directory. Each experiment is a folder within this directory. All images should be saved in the scans directory of the experiments directory.
Visual Studio Redistributable 2022
On some systems it may be necessary to install the Visual Studio 2022 Redistributable. If an error message pops up stating that the files msvcr143.dll and/or msvcp143.dll are missing then this step is necessary.
- Click the above link.
- Open the downloaded file and follow the onscreen prompts to complete the installation. A reboot may be necessary to fully complete the installation.
GPU Driver Update
Certain MuriGlo versions may require an update to the GPU driver on the MuriGlo computer. The next section outlines necessary steps to update the GPU driver.
Updating an NVIDIA GPU Driver
- Ascertain what GPU is installed on the computer that needs a driver upgrade. Below are two options to do this.
Use Device Manager
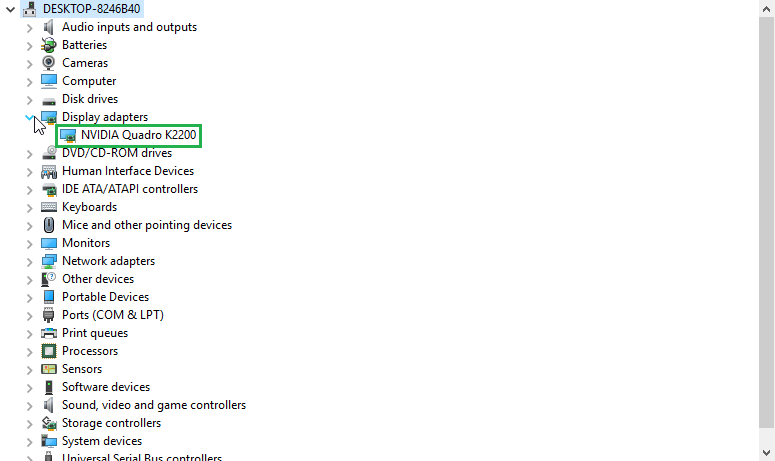
- To view the available GPUs on the system open
Device Managerand navigate toDisplay Adapters. - Note the name and model of the GPU device.

- To view the available GPUs on the system open
Use CUDA-Z
Cuda Z is a standalone tool that gives you useful information on the drivers and GPUs installed on your system. Note this tool only works for NVIDIA GPUs.
- Download CUDA-Z here.
- Lauch CUDA-Z to check the installed driver versions and what GPUs are available on the system.
Install the driver.
- Navigate to the NVIDIA Driver Download webpage.
- Select the
Product Type,Product SeriesandProductthat matches the GPU description seen in eitherDevice ManagerorCUDA-Z.- In the device manager screen shot above, the only availble GPU is an
NVIDIA Quadro K2200. This corresponds to aProduct TypeofQuadro, aProduct SeriesofQuadro Seriesand theProductis theQuadro K2200.
- In the device manager screen shot above, the only availble GPU is an
- Select the correct operating system for the computer you are working on (either Windows 7 or 10).
- Select the
Optimal Driver for Enterprise (ODE)option (do not select theQNF) option. - Click
Search. - The driver search tool should find the latest available driver for download. Download the driver and then launch the installer.
- Use the defaults to complete installing the driver. This may take a significant amount of time to complete.
Set up for Ethernet Version of Motor
This version of the MuriGlo software adds support for an Ethernet version of the motor. The following steps are necessary to set up the motor for use with the MuriGlo software.
- Navigate to
C:\Program Files\Xstrahl\MuriGlo\dataand open therobot_config.inifile. - To use the ethernet version of the motor, add the following line to the file:
[General]
// other settings...
robot_connection_type=1
- The USB version of the motor uses
robot_connection_type=0, or it can be omitted from the file entirely since that is the default connection type. - By default, the motor will be set to the IP address
100.100.1.2. The IP address for the connection port needs to be changed to an address that is on the subnet mask of the motor IP. - Open the control panel and navigate to
Network and Sharing Center>Change adapter settings. - Find the network adapter connected to the motor and right-click on it. Select
Properties. Note that the network adapter is named something similar toUSB to Ethernet Adapter. - Select
Internet Protocol Version 4 (TCP/IPv4)and clickProperties. - Change the IP address to
100.100.1.1and the subnet mask to255.255.255.0. ClickOKto save the changes.